Modify and assign roles in a role-based access control smart contract
Defender allows you to seamlessly oversee and command contract permissions on a grand scale, with the power to view and control access at a granular level. This tutorial shows how to add a smart contract to see and manage its roles, including assigning and removing roles.
Pre-requisites
- OpenZeppelin Defender account.
- Any external wallet (like Metamask) with an EOA that holds funds in Sepolia.
1. Add contract
For this tutorial, you will create a contract that implements the role-based Access Control library using this factory deployed to Sepolia. Your created contract will automatically assign you the admin role to manage its roles.
-
Open the Defender Address Book in a web browser.
-
Fill the form with the following values and click
Create:- Name:
Access Control Factory - Network:
Sepolia - Address:
0xF909B3dBB525fDe7C3e8cd59FbECF3D42c217454
- Name:
image::tutorial-access-control-factory.png[Address Book for factory]
-
Navigate to Transaction Proposals.
-
Fill the General Information section with the following values:
- Name:
Create Access Control contract - Target contract:
Access Control Factory
- Name:
image::tutorial-access-control-tx-general.png[Transaction Proposal general information]
-
For the Function section, select the
createfunction. -
Open the Approval Process section, click the input field and select
Create Approval Process. -
Fill the approval process form with the following values and click
Save Changes:- Name:
Access Control Admin - Type:
EOA - Address: Your wallet EOA address
- Name:
-
Connect your wallet with the EOA address of the approval process created and click
Submit Transaction Proposal.
-
Click on the
Create Access Control contracttransaction proposal. -
Click the top-right button
Approve and Executeand confirm the transaction on your wallet.
-
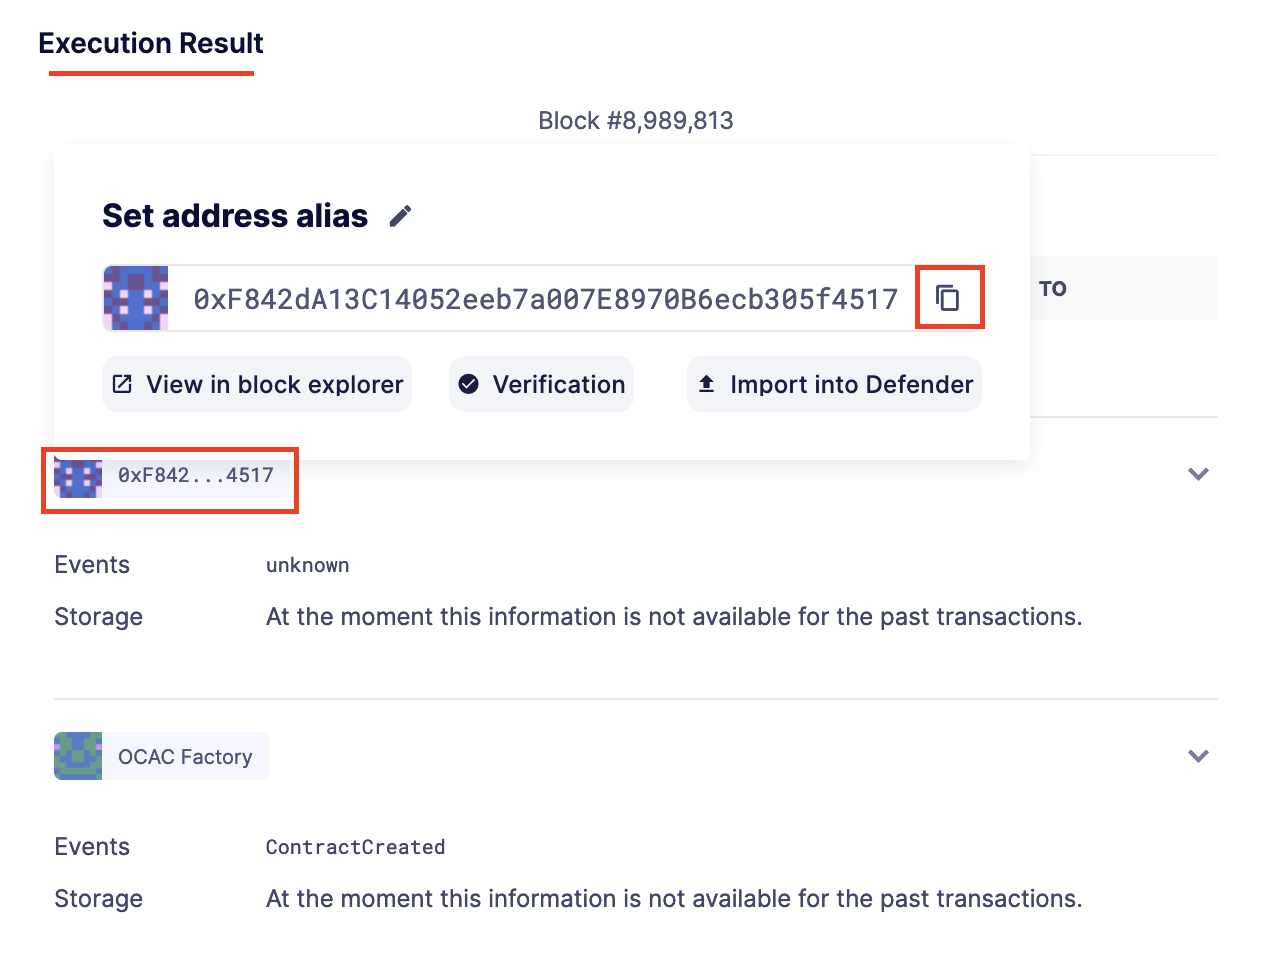
Scroll down and under Execution Result, hover over the first contract to copy its address.
-
Navigate to the Defender https://defender.openzeppelin.com/v2/#/address-book/new Address Book] to add your newly created contract.
-
Fill the form with the following values and click
Create:- Name:
Access Control Contract - Network:
Sepolia - Address: Contract address copied from the previous steps
- ABI: Copy and paste the following
- Name:
["inputs": [],"stateMutability": "nonpayable","type": "constructor","inputs": [],"name": "AccessControlBadConfirmation","type": "error","inputs": [{"internalType": "address","name": "account","type": "address","internalType": "bytes32","name": "neededRole","type": "bytes32"],"name": "AccessControlUnauthorizedAccount","type": "error"},"anonymous": false,"inputs": [{"indexed": true,"internalType": "bytes32","name": "role","type": "bytes32","indexed": true,"internalType": "bytes32","name": "previousAdminRole","type": "bytes32","indexed": true,"internalType": "bytes32","name": "newAdminRole","type": "bytes32"],"name": "RoleAdminChanged","type": "event"},"anonymous": false,"inputs": [{"indexed": true,"internalType": "bytes32","name": "role","type": "bytes32","indexed": true,"internalType": "address","name": "account","type": "address","indexed": true,"internalType": "address","name": "sender","type": "address"],"name": "RoleGranted","type": "event"},"anonymous": false,"inputs": [{"indexed": true,"internalType": "bytes32","name": "role","type": "bytes32","indexed": true,"internalType": "address","name": "account","type": "address","indexed": true,"internalType": "address","name": "sender","type": "address"],"name": "RoleRevoked","type": "event"},"inputs": [],"name": "DEFAULT_ADMIN_ROLE","outputs": [{"internalType": "bytes32","name": "","type": "bytes32"],"stateMutability": "view","type": "function"},"inputs": [],"name": "RANDOM_ROLE","outputs": [{"internalType": "bytes32","name": "","type": "bytes32"],"stateMutability": "view","type": "function"},"inputs": [{"internalType": "bytes32","name": "role","type": "bytes32"],"name": "getRoleAdmin","outputs": ["internalType": "bytes32","name": "","type": "bytes32"],"stateMutability": "view","type": "function"},"inputs": [{"internalType": "bytes32","name": "role","type": "bytes32","internalType": "address","name": "account","type": "address"],"name": "grantRole","outputs": [],"stateMutability": "nonpayable","type": "function"},"inputs": [{"internalType": "bytes32","name": "role","type": "bytes32","internalType": "address","name": "account","type": "address"],"name": "hasRole","outputs": ["internalType": "bool","name": "","type": "bool"],"stateMutability": "view","type": "function"},"inputs": [{"internalType": "bytes32","name": "role","type": "bytes32","internalType": "address","name": "callerConfirmation","type": "address"],"name": "renounceRole","outputs": [],"stateMutability": "nonpayable","type": "function"},"inputs": [{"internalType": "bytes32","name": "role","type": "bytes32","internalType": "address","name": "account","type": "address"],"name": "revokeRole","outputs": [],"stateMutability": "nonpayable","type": "function"},"inputs": [{"internalType": "bytes4","name": "interfaceId","type": "bytes4"],"name": "supportsInterface","outputs": ["internalType": "bool","name": "","type": "bool"],"stateMutability": "view","type": "function"}]-
Navigate to the Access Control page.
-
Observe your newly added contract with the number addresses that hold the admin role.
-
Click on the contract card.
2. View and modify roles
In your contract-specific page, you can see the addresses that hold the DEFAULT_ADMIN_ROLE role, which is the EOA address from the approval process you used to deploy the contract. To make a change, click on the role and input the new address (or remove one address if you want to remove it from the role). Follow these steps to add a new address to the DEFAULT_ADMIN_ROLE:
- Click on the
DEFAULT_ADMIN_ROLErole. - Select any address from the dropdown menu or add a new one.
- Scroll down and click on
Select an Approval Process. - Select your
Access Control Adminapproval process. - Check that your wallet is connected with the right EOA address. If not, click on the button below the field to connect your wallet.
- Click on
Save Changesand confirm the transaction on your wallet. - Wait for the transaction to get executed and check that the new address holds the
DEFAULT_ADMIN_ROLErole.
image::tutorial-access-control-add.gif[Access Control page of contract add role]
For ownable contracts, you can only make changes to the Owner role using an approval process that matches the current owner’s address. When using a multisig as approval process, you will see the pending proposals on the right side of the page.
The page sync every minute, and updates when modifying a role.
Next steps
Congratulations! You can import other contracts and modify their roles.
After configuring Access Control, we recommend seting up Workflows. Learn how to use Workflows with its tutorial here.